
6 Mac Settings Windows Switchers Should Change Immediately
Your Mac Works Fine Out of the Box - but These Six Tweaks Make It Feel Like It Was Built for You

Unboxing a new Mac is a great feeling.
Any guilt about spending a little too much money on a computer disappears instantly.
Even the packaging makes you happy. The premium design and even the smell tell you right away: this was the right decision.
But after the first few days, something starts to feel a little off.
The trackpad does not respond the way you expected. You figured out how to take screenshots, but now they are cluttering up your desktop. And your downloads keep opening on their own, even though you never asked them to.
None of this is your Mac’s fault. It is just a handful of default settings that you can adjust to your needs in a few clicks.
I have six settings for you today.
The ones I would have changed immediately after switching from Windows — if I had known they existed.
1. The Trackpad
Windows users tend to think of laptop trackpads as a necessary evil. When I think back to my old Lenovo, I genuinely shudder. Of course you reach for a mouse instead, even on a laptop.
The Mac trackpad is different. Set it up correctly, and it is not just as good as a mouse. It is smoother, more precise and you will work noticeably faster. Your Mac comes with a range of trackpad settings out of the box.
These three are the ones I recommend without hesitation:
Increase pointer speed.
The default setting feels sluggish to me. You will find it under System Settings → Trackpad → Tracking Speed. Slide it a bit further to the right, and you will wonder how you ever managed with it so slow.
Enable Tap to Click.
Pressing the trackpad down to click feels completely unnecessary to me. We already tap touchscreens for hours every day — a light tap should be enough here too. You will find this setting under Trackpad as well, listed as Tap to Click. Once you enable it, working on the Mac immediately feels more natural.
Turn on Three-Finger Drag.
This one is a bit more specific, and I did not discover it until much later. It lets you drag windows across the screen using three fingers, without having to hold the window with one finger while pushing it with another. The setting is tucked away under System Settings → Accessibility → Pointer Control → Trackpad Options. The difference is hard to describe, you really just have to try it.
If you would rather not dig through the settings menus, Spotlight will get you there faster. Press Command (⌘) + Space, type a keyword — like Trackpad Options — and you are there.
2. The Menu Bar
On Windows, almost everything lives inside the app window itself.
Save, tools, settings — it is all right there in whichever program you are working in.
On the Mac, it works differently. There is always a fixed menu bar running across the top of the screen. It does not belong to any individual window, but its content changes depending on which app is active. I find this concept works really well once you get used to it. What most switchers do not know, though, is this:
You can customize a large part of it.
Frequently used controls can be dragged from the Control Center (the icon with the two small switches, usually at the far right) directly into the menu bar. Hold down the Command (⌘) key and drag any symbol into the menu bar. I have done this with the things I use every day, like Wi-Fi, Bluetooth, and Accessibility Shortcuts.
There are even more options if you click “Edit Controls” inside the Control Center:

A whole range of toggles and shortcuts appears, and you can move any of them into either the Control Center or the menu bar. Taking five minutes to explore this is time well spent.
3. Hot Corners
This feature has been on the Mac for a long time, but most people never set it up.
You usually only find it by accident, or when someone shows it to you. The idea is simple: you assign an action to each corner of your screen, and it triggers whenever you move your mouse into that corner. The classics are things like showing your desktop or locking your screen.
You will find the settings under System Settings → Desktop & Dock.
Scroll all the way down until you see Hot Corners — or take the faster route through Spotlight. Either way, you can assign a different action to each of your four corners. Here are the four I have settled on:

A word of caution, though: the “Desktop” option can get annoying fast. Move your mouse into the wrong corner by accident and all your windows disappear.
The fix is simple: hold down Shift (⇧), Control (⌃), or Command (⌘) while assigning the action to a corner. From then on, the action only triggers when you hold that key while moving into the corner.
4. Finder
Finder is the Mac’s equivalent of Windows Explorer.
And honestly, at first glance it does not look all that different. As a Windows user, you will feel at home here pretty quickly. But Finder has a lot more to offer than Explorer, once you know where to look.
Here are four things I recommend:
You can drag any frequently used folder straight into the sidebar on the left, under Favorites. One click and you are there.
To keep the sidebar from getting too cluttered, you can also control exactly what appears there. In the menu bar, go to Finder → Settings → Sidebar and choose what to show and what to hide. I have removed Movies, Music, and Photos, for example, because I barely store any of that on my MacBook.
The toolbar at the top of the Finder window is fully customizable too. Right-click on it, select Customize Toolbar, and add whichever tools you actually use.

4. One more tip for the toolbar: hold down Command (⌘) and you can drag apps directly into it — I did this with AirDrop. This lets you open files in a specific app by dropping them onto its icon, or send a selected folder to AirDrop with a single click.
5. Screenshots
This topic might matter more to me than it does to you, but a day without screenshots is rare for me — I use them constantly for teaching and content creation.
On Windows, a screenshot goes straight to the clipboard. Nothing lands anywhere visible. On the Mac, every screenshot is saved to the desktop by default. That seems fine at first, but after five screenshots you can already see the desktop turning into a dumping ground.
It bothered me for a while, until I realized how easy it is to fix.
Press Shift (⇧) + Command (⌘) + 4 to take a screenshot directly.
If you use 5 instead of 4, the full Screenshot Toolbar opens. From there you can switch between screenshots and screen recordings, and you will find the Options menu — including the setting for where your screenshots are saved. Choose the Downloads folder, or set it to the clipboard if you usually paste screenshots straight away.
I use a dedicated folder on my desktop. That way my screenshots are always easy to find, without the desktop itself becoming a mess.
6. Downloads
Even after all these years, I still have moments on my Mac where I think: “Did my computer just decide that on its own?”
One of those moments happens with downloads. Safari automatically opens files it considers safe — PDFs, images, archives — without you asking it to. It is not a disaster, but I want to decide for myself when to open a file. My Mac does not need an opinion on that.
There is a setting for this, of course.
Open Safari, go to Safari → Settings → General in the menu bar, and uncheck Open “safe” files after downloading.
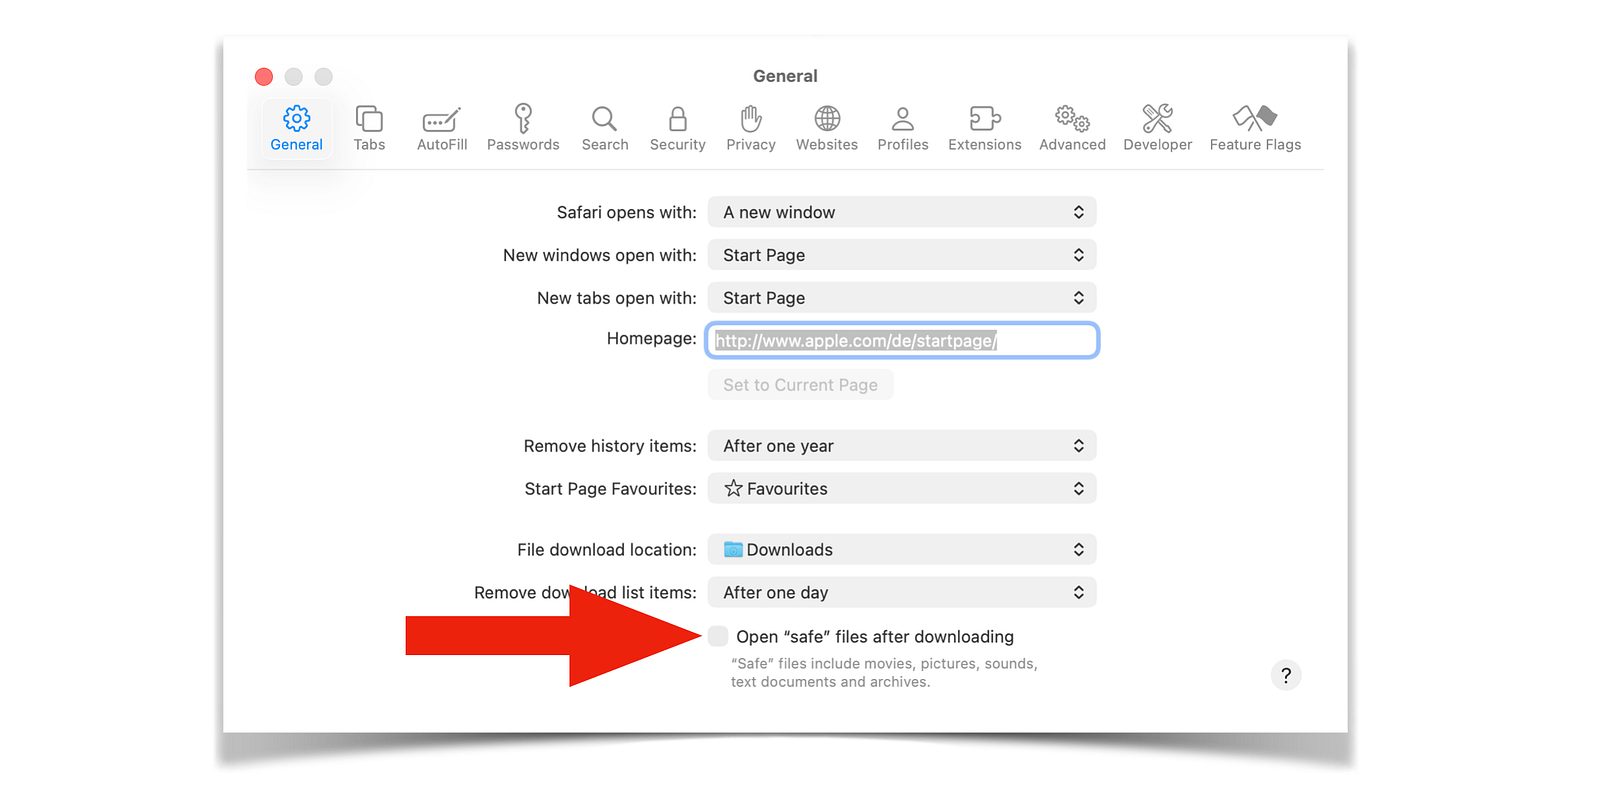
While you are there, it is worth a quick look at the other settings too. You can choose whether your browsing history clears automatically, whether downloads actually go to your Downloads folder, and which homepage opens when Safari starts.
All small steps toward making the Mac feel like your Mac.
Final Thoughts
The Mac does not really adjust to you on its own.
But it comes with plenty of small adjustments hidden away, ready for you to make it yours right after unboxing.
The settings in this article are a starting point, a glimpse of what is possible in just a few minutes. They make the difference between a Mac you enjoy working on and one you only use because it was expensive.
Switching from Windows to Apple is always the right decision, in my opinion.
Do not let a few rough edges in the beginning talk you out of it.
There is a right setting for everything.
And if you want to learn more about switching from Windows to Mac, here are five more things I wish I had known earlier.
Thanks for reading,
Georg
PS: Which of these settings do you wish you had found sooner? Or what did you change right away when you switched?
"PS: Which of these settings do you wish you had found sooner? Or what did you change right away when you switched?"
One thing that seems you cannot change, is in finder. When you are in an app, such as Photoshop, and you select file open, the thumbnail sizes are too small... This was so easy to adjust on explorer, but seems set on finder, that you cannot adjust sizes larger.